

You can find the iOS and iPadOS versions here.

You can find the Android version here.
Getting The Connection String On Your Mobile Device
So you are asking yourself, “How do I get my connection string on my mobile device?” Well, that is tricky since last year Microsoft disabled that ability for mobile on the Azure Portal to be able to copy the Connection String or even the Key itself! The best way around it is if you use a password manager to make a secure note on the desktop version of the app and then sync it to your phone. Or you can just email it to your phone from your desktop, just make sure there are no breaks in the string when you copy it or it will be rejected.
A video walk-through for those that do not like to read!
You can continue if you want to read the full walk-through document below.
The Connection Tab

Here is where you configure the connection to your Azure Storage. In the upper right-hand corner, you will notice an Icon Legend option that is clickable. Clicking it will show you all the menu icons in the App and what action they perform.

The Connection String
You obtain your connection string from the Storage Services panel of the Azure Portal. When you open your Storage Service, you will see an entry called Access Keys on the left-hand side menu. Click this entry, then when the panel opens, click on Show Keys to reveal two things at the top. The top key is just the access key itself; the bottom is the actual Connection String that we will be used to authenticate you within the App. Copy that and then paste it into the Connection String entry field and tap Save to save it.
Clearing The Connection String
To clear the connection string, you can tap the Saved button to clear it from the App. Note you will no longer be able to utilize the App’s functions without it now.
Storage Containers Tab

The Containers tab will list all your available containers with minimal info associated with them. From here you can do four things:
- You can left swipe to delete a container directly from the list.
- Tap the + sign to add a container.
- Tap the Trash Can to Restore any deleted Containers. You must have enabled soft-delete/Versioning for your Containers and Blobs to do this. It can take 3 to 5 minutes to completely delete your container. So if you just deleted it give it some time then restore it.

- Tap a container from the list of containers to see the details of the container and be able to modify it and manage the blobs within that container.
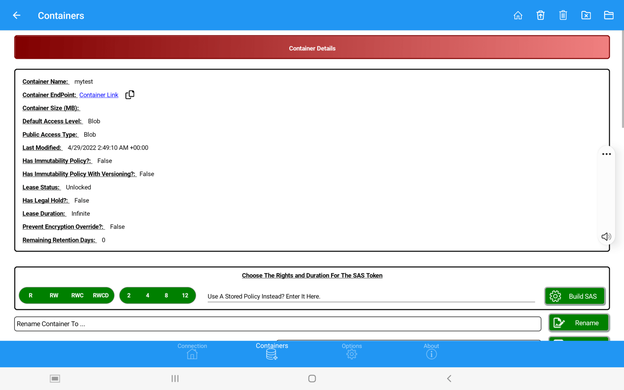
The Containers Detail Page
The Containers Detail Page displays the relevant information regarding this specific container and a couple of options for you. The first option is the ability to rename the container; in essence, you are not physically renaming the container but creating a new container with the new name. Then, the App in the background moves all the original containers blobs to the new container and deletes the old container. This automates a very dull task of having to manually do a rename and move, saving you time and effort.
Container Meta Data
The second task you can do here is set the Meta Data of the container. NOTE: The Meta Key must:
- Be unique; you cannot have two keys with the same name.
- The key must not contain any spaces or special characters.
- You can now just tap an individual Meta entry to delete just that.
Container’s Detail Tab Options
You see several menu options from the top right that you can choose from to perform additional actions. To know what these icons do, go back to the home page, and in the upper right corner, tap the Icon Legend link to display the icon’s functions.
Delete The Container
From the upper right menu, you can delete the container itself and all its contents.
List Blobs
You can click the folder icon to display all the blobs stored within the container and manipulate them.
List Deleted Blobs
You click the folder with the X to list all the deleted and versioned blobs for that container and restore individual files by tapping on them.
Undelete All Blobs
You can click the trash can with the up arrow to restore all the deleted files within the container in one go as well.
Go Home
You can click the house (Home) button to return to the previous page in the App if you want.
The Blobs Listing Page

The blobs listing shows you all the blobs within the selected container available to you. You can tap a blob to see the blob details and take several actions. On the blob detail page, you can rename, move, copy, and set the MetaData for the blob in one location for that specific blob. You can also left swipe a blob entry to delete it directly from the listing or right swipe to view the Blobs details. Also, you can multi-select Blobs and delete them all at once with the new trash can in the tool bar menu…
Blobs List Menu
The upper right menu has several button icons that perform several tasks for you in an automated fashion.
Upload Blobs
Clicking the up-arrow icon allows you to upload multiple files from your mobile device to this container.
Muliti-Select Move
Clicking the little guy with the dolly will move all the blobs in this container to another container of your choosing. This will leave this current container behind but empty with the original blobs now in their new home.
Multi-Select Copy
Tapping the copy icon will allow you to access all the ways to copy Blobs available.
Multi-Select and Delete
Blob Listing Swiping Left and Right
Go Back
And finally, if you click Home, it will take you back to the container details page you were at previously.
The Advanced Options Tab
From advanced options, you can do several unique things to containers that are not done that often but require unique settings to be able to do.
Enable Bio-Metric Auth and Export To Excel
The first available option is easy to recognize as you can enable Bio-Metric Authentication for the App to control its access. Fail Bio-Metric 4 times and the app will close. The app will continue to close until your reboot your device! Once rebooted it will allow you to try authenticating again. The next option allows you to create an Excel Workbook with a page per container with a breakdown of all the pertinent blobs and their detailed information. You can choose among the three types of blobs that you can export to Excel and then tap the button to generate the Xlxs file.
Set Blob Access by Tier
The third option is to set the Blob Access Tier by container; you can set it to Hot, Cold, or Archive by the container. Just tap the type you want the container to be, then select a container from the list to automatically convert it.
Set Share Tier Access By Share
This allows you to set the access tier for your available shares. Just select the access type and then select a share to enable that on it. You can view the Share Details Page to see the status of the change to the selected tier as well.
The About Tab
About shows you information about the App like the version and, in the upper right corner, gives you a button to email support as well. Also, it links to these instructions and the App Privacy Policy and EULA as well.
From here you can also manage your app subscription, you can refresh your subscription, upgrade it or cancel it through the Play Store if one is active.
Share Specific Info
File Shares manipulation is similar to Containers and Blobs so I will not repeat what is already put down for those steps. I am including the File Share specific information below for you that is unique to Shares.
Deleting all files and directories in a share is just like in a container. Here is a video example for you:
Copying files and directories is a little unique compared to containers. To copy a directory and its subdirectories, you only need to go through and select the individual directories as the app will automatically select the files for you for each one. Here is a collection of examples of copies between shares and between directories in a share:
Creating a directory is easy as clicking the Plus Sign (+) from the menu and naming the directory (following the DNS naming standard) or selecting a directory if you are creating a subdirectory. Here is an example of creating a subdirectory and then moving it:
Discover more from Spindlecrank.com
Subscribe to get the latest posts to your email.